Cooley Garlic

wpid-20150724_212414.jpg

Christmas is a long way away yet, but it was Christmas last year where our Garlic story began.

We had ordered seed garlic online and it a couple of weeks before Christmas last year and it wasn’t until Christmas week that we got the chance to split the bulbs into individual cloves and sow them in their newly prepared beds. We knew we were leaving it late to get them sown but sow them we did. Once they were in the ground we had little to do until the weather picked up and got quite warm and dry in June. We gave them plenty of water during this period to help bring on the bulds and ensure they would be a good size a not dry out. We took up a few sample bulbs in late June to see if they were ready but we decided to give them a couple of extra weeks.

wpid-20150724_205656.jpg

In early July we picked some more bulbs and made the decision to harvest most of them that appeared to be ready. After two weeks of drying in the shed we trim away the stems,give them a gentle scrub, wash and pack them and then they will be ready to go.

wpid-20150725_163147.jpg

As we have more garlic that we could ever use, we decide to sell it to friends and family! Going well so far 🙂 If you would like to order garlic from us please send us a message here or on our facebook page 🙂 https://www.facebook.com/fieldtoforkireland

wpid-20150724_214548.jpg wpid-20150724_212355.jpg wpid-20150725_093654.jpg

Looking for some thrill in Carlingford?

IMG_0725

When I moved to Cooley, I promised myself that I won’t take the beautiful surroundings for granted and that we would use the outdoors as much as possible.  So we always try to discover new walks, new picnic places…last weekend we decided to explore a little bit of Carlingford Lough and I have to say we were not disappointed.

IMG_0718

I wasn’t sure how the kids will react to the speed boat trip but I have to say that by the end of it I was convinced that if my daughter becomes the captain of a boat one day, lives will be defnitely at risk….

IMG_0723

We left the harbour and saw Carlingford and its beautiful surroundings, the Cooley and Mourne mountains from the water, all the while their were giggles and laughter from the back of the boat.  We loved the 45 min trip and the girls are asking when they can go again! A BIG thank you to Shane at Louth Advenutres http://www.louthadventures.ie/ who provides such a great, family friendly service!


The crop!

20150626_203934

It’s definitely time for the garden update! The summer is finally in the full swing and so is our garden 🙂

We have definitely feel that there is much more work this year as we decided to enlarge the garden slightly.I have to say that it takes some time to adjust to the fact that you have the veg in the garden and that you
don’t need to buy as much weekly! Bur we seem to be doing much better than last year!

The most successful crops so far are;

Lettuce,

20150622_180226 wpid-20150522_192435.jpg
We have been quite good using it this year, loads of fresh salads made. Frnakly we had a bit of help, as my parents came over and used the garden to the fullest – which was fantastic! Overall, we have definitely learnt from last year experience and manage the quantity much better this year.

Radish,

wpid-20150503_103811.jpg wpid-20150419_142540.jpg
Crop of radish has been very successful also. Personally I don’t like radish on its own and use it mainly for salads, nice addition and lovely peppery taste.

Asparagus

wpid-20150425_163440.jpg wpid-20150522_195505.jpg
Asparagus was a real surprise. As any newbies we didn’t fully know what to expect but we were lucky to enjoy over 2 months of gradual asparagus crop. The most difficult part is to cut them on time before they become
too big and starchy and then stop cutting them in June just as you got used to having it every other day.

We are still waiting for our new bettrot, potatoes, cabbage, spring onions and of course Garlic!

Pallet projects

wpid-20150317_170415.jpg

Spring is a busy time in the garden, there is so much that needs doing but that doesn’t mean we don’t get some timeto experiment a little outside of the veg patch. In recent weeks we have been busy with some Pallet Projects. I had obtained some old pallets of various colours, red, blue, brown and orange and I was determined to do something with them other than chopping them up for firewood.

I had been tasked with a few projects, a small bookshelf for our bedroom, a bookshelf for the kids room and a garden bench………..to start with. I believe there are now more in the pipeline, one of the downsides of successfully completing the above tasks.

wpid-20150227_191700.jpg wpid-20150227_191634.jpg

The first bookshelf for our own bedroom was the hardest, as having never made more than flat pack furniture (which isn’t as easy as it would appear) my confidence in my own carpentry skills was non- existent. After some head scratching and fumbling about as to how the shelf should look and what tools and bits and bobs I would need I got down to business. An orange pallet was chosen, washed and sanded. After it was cut to size I joined the necessary pieces together and gave it a quick coat of wood preserver. And that was it. Not hard really but it took a while to get from in my head to on the wall. With that job out of the way, it was onto the kids bookshelf.

wpid-20150411_135355.jpg

This was a little more tricky to assemble due to its size and the particular design I came up with but still it was put together in one morning. The process was the same as above, the wood was washed, disinfected and sanded. After I put it together I then painted it. All parts got two coats. In hindsight, if I were making this again I would have painted the wood prior to assembling as this would have been easier. I would have just had to touch it up after it was put together. Anyway it’s up on the wall, serving it’s purpose and kids love it so that is enough for me!

wpid-20150411_114724.jpg wpid-20150411_114734.jpg

IMG_0017 IMG_0021 wpid-20150506_204815.jpg


The garden bench was next.

wpid-20150411_192756.jpg

This was by far the easiest, even though it was the largest piece of pallet furniture of the three pieces I put together. If I am honest, I actually made it more difficult for myself than I should have. Anyway, long story short, you can use two or three pallets, three being the easier option……..I of course used two.

wpid-20150411_191715.jpg wpid-20150411_190907.jpg

wpid-20150411_192808.jpg

Cut two pallets in half and place a half from each pallet on top of each other horizontially to act as the seat. If you use two pallets as I did, then join the other two vertically with a piece of 2 by 4 and then join this to the two horizontal halves. If you choose to use three pallets, the third pallet would be used instead of joining the two halves together vertically for the back support. But this isn’t a big issue. After a very brief poll on Facebook as to what colour the bench should be painted, purple or brown, purple won out. So being democratic as we are at Field to Fork the bench was duly painted purple. I believe I now have a garden table and a wine rack to make………………..

20150524_162950

Asparagus Spears with lemon zest, garlic and double cream.

image

Ingredients:
8 Asparagus Spears
Ready rolled puff pastry
Zest of one lemon
Tsp of fresh parsley
1 clove of garlic
100 mls of double cream
50 grams of grated parmesan.
Black pepper.

Get cooking:
1. Boil the asparagus for 5 to 10 mins depending on the thickness. As it is boiling roll out the pastry with the longest edge closest to you and cut into four strips about 3inches thick. Score the pastry about 1 cm from the edge but don’t cut right through.

2. Gently heat the parmesan, finely chopped garlic, double cream and ground black pepper. Place half of this on the centre of each pastry strip and then place 2 spears of asparagus on top. Then place the remainder of the mixture over the spears. Heat in a pre-heated oven at 200 degrees for about 15-18 mins until golden brown.

3. As this is cooking grate the zest and mix with the finely chopped parsley.

4.  Once the tarts are cooked, sprinkle with the lemon zest and parsley and serve immediately while crisp and hot.

A tart per person with a small salad in a perfect starter or 2 tarts per person for a main.

Garden update and weed struggle!

We have been off the radar recently, holidays…races….new challenges…but that hasn’t meant we haven’t been keeping ourselves busy.  As expected this time of the year there is a lot going on in the garden and veg patch, everywhere you look there is something to be done.

So just a little update on what is growing and some of our current struggles 😉

Updates…

We are very happy with our lettuces…over the last couple of years we found that the cut-and-come-again varieties of lettuces work best for us.  They give a good supply of fresh salad leaves over a number of weeks and fresh plants can be sown every few weeks so you never run out, well until late Autumn that is, when the cold weather returns.

wpid-20150419_142527.jpg

wpid-20150426_144617.jpg

Our radishes are nearly ready and hopefully will be still there when my mum arrives in couple of weeks, as it is one her favorite salad veggies.

wpid-20150419_142540.jpg

And finally the asparagus, we had to wait two years before we could look forward to eating it.  And that is what we are doing right now. There are lovely fresh aspargus spears popping up everywhere! What is even better our youngest daughter seems to share our excitement 🙂

wpid-20150414_191545.jpg

wpid-20150414_191130.jpg

wpid-20150415_183412.jpg

Of course it has not all been plain sailing. Even though we are very happy with our slightly bigger veg patch thanks to some new raised beds we built, this also means that there is much more work… of which weeding is definitely my least favorite…And yes this has to be done even when you have raised beds.

But not to worry, whatever stage you are at hold on to the thought that in a couple of weeks you will be enjoying some lovely fresh salads and veggies.

Busy long weekend!

wpid-20150315_125142.jpg

We are still recovering after such a busy long weekend! Weather was great so plenty of time outside, which let us finish up jobs in the garden and see the changes happen.

Old potato bed changing into new onion and bean bed!

wpid-20150207_153634.jpg wpid-20150315_120744.jpg wpid-20150315_122314.jpg
This time, I decided to it is my turn to do a bit of  heavy lifting, so I shoveled some top soil into our newly built raised beds.I could not lift my arms for couple of days after! Another job that had to be done was turning the soil. It seemed easy at first but just managed to do 2 raise beds and left the rest for the coming weekend!

wpid-20150315_163502.jpg

We put our first seeds in the ground as well which is always very exciting! So far we have lettuce, radish, peas, spring onion, beetroot.

wpid-20150309_181045.jpg wpid-20150309_182357.jpg wpid-20150309_182247.jpg

Many more to go, and the kids raised bed is still empty as they are negotiating what should we place there…it’s great to see them fighting…over broccoli and corn…:) Their art work these days seem to be preoccupied with the theme of the garden as well!

wpid-20150318_220840.jpg

So the plan for the coming weekend is garden, garden, garden! And some walks of course! 🙂

Making our new raised beds

IMG_0575

Last year I planted potatoes straight into the ground, not a problem initially, but it became a real nightmare of a task to maintain as the grass form the field beside the plot encroached upon the bed The solution, this year I am building a raised bed around the potato patch to help control the weeds. Similarly the bed that housed our onions last year had a real problem with weeds, this was more to do with the lack of preparation I put into the soil.

I have been looking online at various constructions of raised beds from scrap timber so over the last two weekends I set about building the first of my new raised beds. I had some scrap timber at home and bought the rest from DPL in Dundalk. I started with the old onion bed as it was the easier job of the two and also as I needed to have it in operation sooner that the old spud bed.

wpid-20150301_115618.jpg


I measured out the bed and built the surround first then I laid the bottom of the bed with compost and cardboard to act as a mulch and prevent the weeds growing up through the bed. I then has to fill the bed with top soil which I was able to source locally. I got one tonne which I though was more than enough but I now know I will probably need another 2 tonne to complete the job on both of the new beds.

wpid-20150301_130117.jpg

When the top soil was placed in the bed I then spilt the bed into two as it was very large. This will give me give me a good deal more capacity to produce veg than last year. Once that was complete I got straight to work sowing some seeds, radish, cut-and-come-again lettuces and spring onions then they were all watered and covered with a little plastic tunnel I had made from old wire coat hangers and plastic sheeting.

wpid-20150307_161135.jpg

wpid-20150307_163247.jpg

It was a tough weekends’ work. I gave myself far too much labour having to shovel all the soil from my trailer into the veg patch. Added to that I also have a large amount of logs from a tree that was cut down. These all have to first be cut to size and then chopped in half so for the past few weekends I have been working away at these and there is still a lot more to do.

wpid-20150309_182629.jpg

Had I been more prepared I could have got the soil last Autumn and cut the tree down earlier and then chip-away at the work bit by bit over the Winter, but we live and learn, hopefully as we go on we will get into a routine and the work will be more manageable.

wpid-img-20150307-wa0001.jpeg

On the plus side though, the Log House is beginning to fill up after being plundered over the winter. Hopefully I will have a good enough stock of logs this year that I will not need to purchase any…..well that’s the plan.

Anyone waiting for the winter to finally go away?

IMG_0985

View from Slieve Foye gap

We were hoping to really dig in the garden work this weekend but once more the weather held us back. So even though it was cold we decided to do one of our favorite walks in the area – walk over the mountain which ends with well deserved hot chocolate in Dans coffee shop 🙂

I have a great sentiment towards this walk as I actually manage to do it once from the our house, telling friends who just arrived from Poland and had no clue what is where, that we can actually walk to the coffee shop…not mentioning of course that it will take us about 2h and there is a mountain in the middle 😉

But going back to the walk itself, it is definitely a popular one with number of options. We tend to leave one car in Carlingford (which is our destination) and one on the other side of Slieve Foye, at the start of the trail, which is actually part of the tain way (https://www.google.ie/maps/@54.030587,-6.230725,3a,75y,29.09h,73.09t/data=!3m4!1e1!3m2!1s794ppLPbJvnHCoVMkgHZGA!2e0)

There is number of taxi companies in Carlingford, and it won’t cost you too much if you don’t want to involve the logistic of 2 cars.

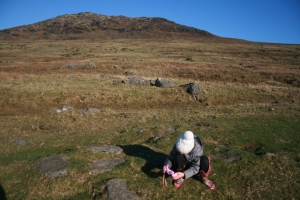
So if you start form Glenmore AC stone, the Glenmore side of the trail leads up to the Slieve Foye saddle by a lovely path (once you pass the first short part on the stones, that is). It is not buggy friendly but it gently rises so 4 year old and older can handle it easily. The views as you walk up are well worth it and the feeling of freedom is amazing. Kids are usually entertained by jumping from stone to stone and watching the sheep…:)

IMG_0973

IMG_1269

IMG_0976

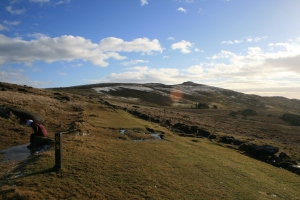
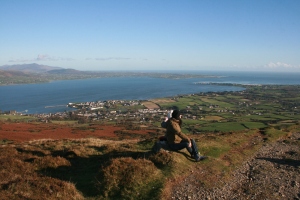
As you reach the top of the saddle, you are greeted with spectacular view of Carlingford Lough and the Mourne mountain.

IMG_0994

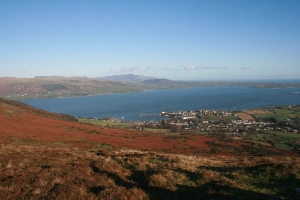
It’s great to have a picnic there (if it’s not too windy) and enjoy the lovely view. Watch out for the horses tha might want to steal part of your lunch 😉 If you wish to enjoy an even better view of both Dundalk bay and Mourne Mountains, at this point you can turn left up the trail and climb Slieve Foye (the highest mountain in Louth). We are yet to do it with kids, maybe this year 🙂

IMG_1280

View of Slieve Foye from the top of the gap


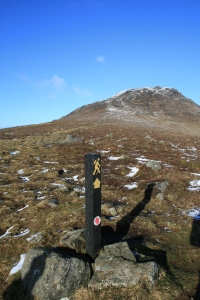
Also at this point you can turn right and walk up till he Meave’s Gap to see the whole of Cooley Peninsula. There is a narrow path from Meave’s gap which will bring you down onto the Rooskey road and then Carlingford.

IMG_4027

Path from the Slieve Foye gap towards Meave’s Gap


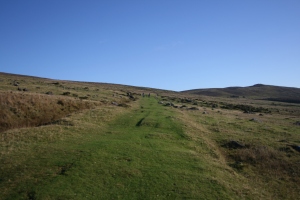
We usually just go down the trail towards Carlingford, as at this stage we are all a bit impatient to get our hot chocolate. The trail is quite clearly marked so even if you are there for the first time you shouldn’t have a problem finding your way.

IMG_1317

Path from the gap towards Carlingford


So whatever option you chose, make sure to take you time, take it all in and enjoy the hot chocolate! 🙂